
For organizations looking to build and operate an on-premise private cloud solution using OpenStack, one of the most important aspects to consider is networking. As a deployment grows in scale, so too do the complexities of performance, operational stability, and reliability. Below, Two Sigma engineer Tony Walker explains, from a practitioner’s perspective, how the company implemented a High Availability networking architecture, suitable for deployment at enterprise scale and beyond.
When Two Sigma started building its private cloud, we had some key goals/objectives that we could not reasonably meet with the ‘out of the box’ OpenStack, so we decided to implement our own solutions. Since that time, a number of alternatives to building and operating a customized solution have emerged, not only from the OpenStack project (see distributed virtual router) but also from vendors specializing in proprietary solutions.
Networking and OpenStack
Three things were of paramount importance to us when we started to think about our cloud network architecture:
- Users should be able to create tenant networks of ‘real’ IPs reachable from anywhere in our environment.
- Tenant networking should be highly available—no single-points of failure.
- OpenStack networking performance should be as close to bare-metal as possible.
Let’s explore each of these points:
Giving VMs ‘real’ IPs
In typical OpenStack deployments, users are able to create their own private networks that have no ingress access and often overlap to further isolate user networking. If you’re operating your OpenStack deployment behind a firewall, as we are, the need for a private network (and ad-hoc public-facing floating IPs) is fairly limited. In our experience, developers prefer direct access to VMs and, given our use of Kerberos for authentication, it is imperative that we ensure each VM has a valid FQDN.
Traditional OpenStack networking
The Neutron (OpenStack’s networking service) model achieves external connectivity for VMs by connecting tenant networks to virtual routers. These routers (typically, physical machines running the Neutron L3 agent) are then connected to “external” networks (the gateway interface) which can be routed from within the general network. For more information on traditional OpenStack networking, see here.
Moving from traditional to highly available
Overview
One choice that needs to be made early on is which network isolation technology to use. If you’re going to run a deployment consisting of multiple racks of servers, it’s likely that they will exist in separate layer-2 network domains (this was a conscious choice for us, at least). In that case, the only real option available is to use an ‘overlay’ provider. Doing so allows OpenStack networks to span multiple layer-2 domains, which gives you the first building block necessary for configuring a highly available solution. We chose VXLAN as the overlay protocol primarily because of the availability of network cards that supported hardware offloading of the encapsulation/de-encapsulation process. By leveraging the ability to move computation-heavy work into the NIC hardware, we were able to recognize a ~4x performance improvement over a standard software-only setup.
With VXLAN in use, you can start with a large network block (we chose /20 to begin with) from which OpenStack users can create their own networks. Vanilla OpenStack allows users to specify arbitrary IP ranges when creating networks, which could complicate things when using a fixed block. For this reason, we not only had to mask this ability but also to implement a service to automatically choose the next available subnet from the range. We then employed a separate service that orchestrated the first stage of our HA configuration.
Each time a new network is created, two logical routers (Neutron gateways) are connected and attached to it. Each router exists in a different rack from the other and connects to an external gateway network, thus ensuring redundant connectivity to and from your VMs.
Implementing redundancy with VRRP and BGP
In a traditional setup, each network has a single default gateway, which is the first IP address from its subnet. In order to implement the HA configuration mentioned above, you must ensure that ingress and egress are possible over both routers in the event of a failure.
Egress (from VMs to outside)
Since VMs can only have a single default gateway, we made use of a technology called VRRP (Virtual Router Redundancy Protocol) which ensures that at any time, only one of the virtual routers will host the default gateway IP. If a rack or Neutron gateway fails, the VRRP instances on the failing logical routers will stop sending heartbeat messages, causing the “partner” routers to take over the VIP (virtual IP address) and resume the gateway function. To achieve this, we modified OpenStack Neutron to inject a VRRP instance into the network namespace of each logical router, with a configuration for them to bounce a Virtual IP (the default gateway) between them. As we mentioned earlier, things have come a long way since we started and you can find the official OpenStack article on their own VRRP implementation here.
Ingress (from outside to VMs)
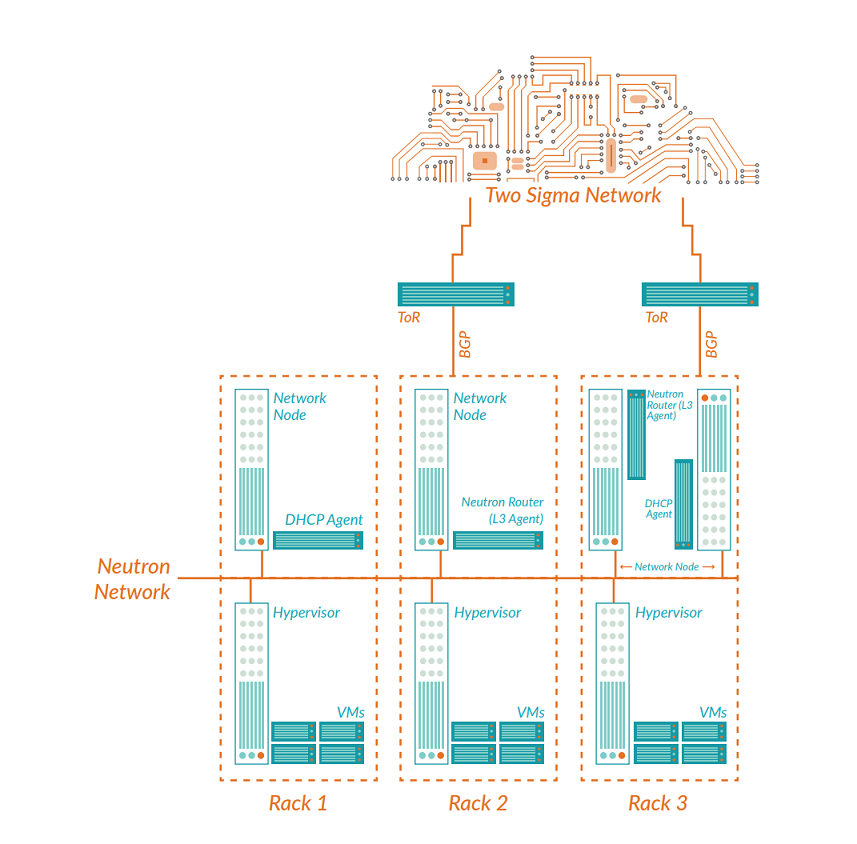
Traditionally, the default gateway for a router would be connected to a ToR (top of rack) switch and this would be known to external networks as the destination for all traffic destined for a particular OpenStack network. With the modifications using VRRP above, you now have two gateways split across different racks which makes things a little more complex. It is now necessary for both ToR switches to advertise the fact that they can route traffic to a given network in order to cope with a failure scenario. For this requirement, you can use a routing protocol called BGP (Border Gateway Protocol). Each Neutron gateway runs a BGP daemon that establishes a session between itself and the ToR switch. As more OpenStack networks are created, we use a service to inject a route for each of them into both logical routers (with slightly different priorities). If a rack or Neutron gateway fails, the BGP session will eventually timeout and the routes on the upstream switches will be withdrawn. When that occurs, incoming connections will automatically follow the routes learned from the other Neutron gateway nodes. Much like VRRP, BGP has also made its way into OpenStack—see here for more information. When it’s all put together, our logical diagram now looks like this:
Operational experience
As you can see by now, it is possible to configure your OpenStack network to be highly available with much of the necessary work now supported by the vanilla product. But what is it like to run a system like this? Below are some observations taken from the 3+ years during which we’ve been operating our OpenStack environments.
Deployment strategy
Deciding how many and where your Neutron gateways should be deployed is initially fairly simple. At a bare minimum, there should be at least two Neutron gateway nodes spread across more than one rack to satisfy basic HA requirements. Another option is to run a Neutron L3 agent on every compute node, which would significantly improve network performance as the load is distributed among more nodes in the cluster. However, the overlay network and Neutron gateway already introduce a new level of complexity, and we decided that dealing with a gateway per node would increase the complexity to point where the cost outweighed the benefits. As the number of tenant networks increases and you increase the number of compute nodes, you’ll want to scale up your gateways, as well. We have found that running three to six Neutron gateways per rack strikes a good balance between redundancy, performance, and complexity.
Troubleshooting
Troubleshooting almost warrants an article of its own. In short, though, operating an overlay network setup at scale takes a lot of work. Some of this is inherent in the use of overlays; by adding an additional layer “on top” of your regular network, your troubleshooting steps become much more complex. Locating ingress/egress points on the network now requires determining which routers are involved and which network nodes are hosting them. The virtual routers are located in network namespaces within each node, which means adapting traditional troubleshooting techniques slightly. Some discoveries were simple: e.g. due to the use of iptables for firewall rules, the net.nf_conntrack_max kernel setting needs to be increased well beyond the default. Further, each network namespace gets its own setting so we would often find individual networks dropping packets on a gateway that otherwise looked healthy under normal load.
Moving on to the two-router HA setup, this introduced a new complexity in that ingress to the VMs could occur via either router depending on the 5-tuple TCP/IP hash. Although this often provides an increase in performance, we frequently found that some TCP connections to/from a VM would work, while others would not. This often required the use of tcptraceroute, where we could specify different source ports and thus modify the 5-tuple involved.
In each of these cases, we developed tooling to automate or at least take as much of the guesswork out of troubleshooting as possible. This included a tool for displaying VM health, which discovered all up/downstream connections and individually tested them.
Performance and tuning
We use Open vSwitch to operate the VXLAN tunnels between compute and network gateway nodes. When handled in software, VXLAN encap/decap imposes significant overhead, which we found resulted in a maximum single TCP throughput of less than 1Gbps. Using cards which provide hardware offload capability is essential to alleviate this problem.
Back in the Juno version of OpenStack, Open vSwitch wasn’t capable of running the necessary native firewall setup required. For this reason, VMs were first attached to a Linux bridge (which can implement firewall rules via IPTables) that is in turn connected to the Open vSwitch bridge. We found that this additional hop also introduced latency which, at the time, there was no clear way to reduce. There’s an excellent document from the RDO project, which offers an deep-dive into this setup here. Since then, the Open vSwitch driver has been improved and OpenStack now includes a native Open vSwitch firewall driver. As a result, this step is no longer required.
You may recall from the introduction that one of our objectives was to get our OpenStack networking performance as close to bare-metal as possible. Certainly, the Linux-bridge-hop problem contributed to an unavoidable slowdown compared to bare-metal. However, another area that needed investigation was the default MTU value. The version of OpenStack we have deployed enforces a default MTU of 1500 for VMs, which ultimately limited our maximum throughput. Elsewhere in our data center networks, we’ve started to standardize on jumbo frames (MTU of 9000) and after increasing the MTU inside of VMs and all points in between we’ve seen significant performance boosts as well. Yet again, the latest OpenStack supports configuring this value–see here for more information.
IP space efficiency
Our HA setup has also imposed some reduction in space availability on our tenant networks. Using VRRP causes a pair of logical routers to consume three IP addresses on each subnet (the VIP and one for each router). In addition, we also run two Neutron DHCP agents, which consume two more IPs. The net result is that for every tenant network we have, we waste five IPs instead of one as in typical networking setups. With non-overlapping IP assignments, we are eating RFC1918 IP space very quickly and this has forced us to rethink some of our policies (e.g., should every tenant be able to create a network?) and consider the potential move to IPV6.
Looking ahead
Where to go from here? When we started out, the HA blueprint had only just come into existence, and in this post we’ve described how we went about rolling our own solutions to the problems at hand.
Where possible, we try to leverage existing technologies and implementations in order to get what we need, but this often isn’t practical—especially when using nascent open source software. Not only does the OpenStack project now have the concept of L3 high availability (see here) but they’ve gone a step further with DVR (distributed virtual routing), which essentially gives direct network access to VMs on their compute nodes rather than on dedicated gateways.
This sounds great, in theory, but the effective duplication of network namespaces into the compute nodes brings with it a raft of new concerns and considerations—especially from an operational maintenance perspective. If it’s difficult troubleshooting with a limited set of Neutron gateways, then the thought of multiplying that number by the compute nodes in each zone is mind boggling. Furthermore, having each node act as a router in this sense will cause other side effects, like an increase in compute usage and contention when dealing with the networking stack. Concerns also linger around the overhead required when, for example, starting a new VM. The ARP tables in all compute nodes are prepopulated with all possible entries, which means that all compute nodes in a tenant network will need their tables to be in sync at all times, which may carry performance penalties that take time to uncover at scale.
There have been many interesting developments in the Openstack networking space since we started our deployment, and we look forward to exploring the new possibilities and challenges that lie ahead.